Last reviewed by James Vandegrift, Co-Founder — May 2026
← Back to BlogWATERPROOFING
How to Waterproof a Shower with Schluter KERDI
KV Tileworks LLC · Sanford, FL · 2026
Waterproofing a shower with Schluter KERDI means embedding the fabric membrane into unmodified thinset over cement board or drywall, lapping every seam, installing KERDI-BAND at all transitions, and setting tile with unmodified thinset only, modified thinset will not bond to KERDI's backing.
Tile and grout are not waterproof. Water moves right through grout joints over time, and once it reaches the substrate behind your walls, you get mold, rot, failed tile, and a full teardown to fix it. A lot of homeowners find this out the hard way years after a cheap install.
The fix is a proper waterproofing membrane installed before tile ever goes up. On most shower builds, we use Schluter KERDI. Here is why, and exactly how we install it.
Why KERDI Over Other Options
RedGard, Laticrete Hydro Ban, Wedi boards, custom sheet membranes. They all work when installed right. We prefer KERDI for a few specific reasons.
It bonds directly to the substrate with no air gap. Liquid membranes like RedGard can crack at corners if the surface beneath flexes slightly. KERDI is a bonded fabric sheet so it moves with the substrate instead of against it. It is also a complete system: Schluter makes the drain (KERDI-DRAIN), the corner tape (KERDI-BAND), and pre-sloped shower trays that all integrate together. When everything is from the same manufacturer and installed per spec, there is no pointing fingers if something fails.
There is also no curing window. Liquid membranes need 24 to 48 hours to dry and sometimes require two coats. With KERDI you can often tile the same day. On a job site, that matters.
Critical detail: KERDI requires unmodified thinset only. No polymer additives. This catches a lot of contractors who just grab whatever bag is on the truck. Modified thinset will not bond correctly to KERDI's fabric backing and it voids the warranty. White bags labeled "unmodified" are what you want. Versabond WF (white) and Laticrete 254 Platinum are common choices. Read the bag before you mix anything.
What You Need
- Schluter KERDI membrane sheet or roll
- KERDI-BAND (4-inch width for corners and seams)
- KERDI-DRAIN matching your drain pipe size
- Unmodified white thinset mortar (required)
- 1/4 x 3/16-inch V-notch trowel
- Pool trowel or grout float for pressing the membrane
- Utility knife and straightedge
- Test plug that fits your drain pipe
Step by Step
Prep the Substrate
KERDI goes over cement board (Durock, HardieBacker), standard drywall in above-pan wall areas, or Schluter's own KERDI-Board. Whatever you use, every fastener head needs to be flush or slightly recessed. A proud screw head creates a void behind the membrane. Fill gaps between panels with unmodified thinset and let it firm up before you membrane over them.
Pre-Treat Every Inside Corner with KERDI-BAND
Inside corners are where showers fail. Floor to wall, wall to wall, anywhere two planes meet. Before you hang full-sheet KERDI, apply KERDI-BAND to every one of those corners. Spread unmodified thinset in the corner, press KERDI-BAND in centered on the fold, then skim more thinset over the top to fully embed it. No voids, no bubbles. Let it get tacky before moving to the full sheets.
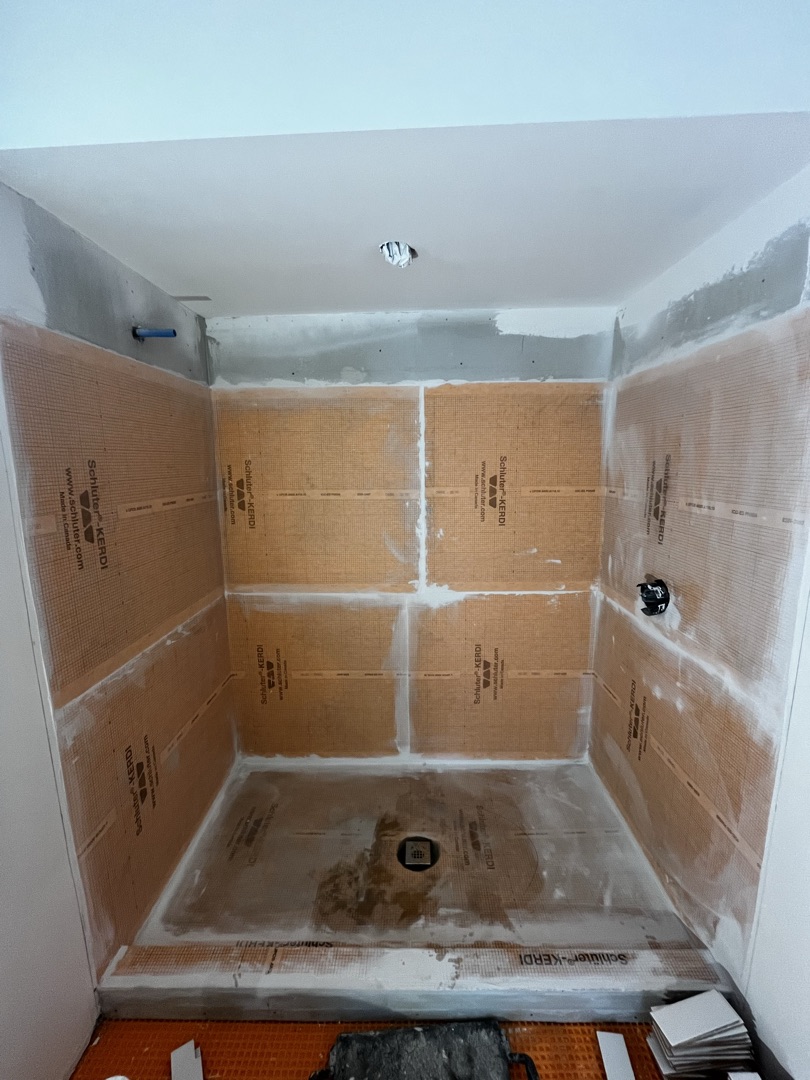
Apply the KERDI Sheet to Walls
Mix your unmodified thinset to a peanut butter consistency. Spread it on the wall with your V-notch trowel, working section by section. Unroll KERDI onto the wet thinset and press firmly using a pool float in overlapping strokes. Seams between sheets need a minimum 2-inch overlap with thinset under both layers at every overlap. Work from the bottom of the wall up. Any spot that springs back when you press it means you have a void. Add more thinset and re-embed it.
Set the Shower Pan and KERDI-DRAIN
The floor needs to slope 1/4 inch per foot toward the drain. You can build that slope with a mortar bed or use a pre-sloped KERDI shower tray. Either way, the KERDI-DRAIN replaces your standard drain body. Its integrated flange is what the KERDI membrane bonds to, creating one continuous waterproof plane from the walls down through the floor and out the drain. Bond the membrane onto the floor, lap it up the walls minimum 2 inches, and embed KERDI-BAND at the floor-to-wall transition. Seal over the KERDI-DRAIN flange the same way you did the corners.
Flood Test Before Any Tile Goes Up
Plug the drain with a test plug. Fill the pan with water up to the top of the curb, or at least 2 inches deep. Leave it 24 hours. Check the floor below the bathroom, the walls around the shower, and the ceiling below if the shower is on an upper floor. No dampness anywhere means you are clear to tile. If water shows up somewhere, you find it now instead of two years from now after the tile is already in.
We flood test every shower we build. It is not optional and it does not add much time. Skip it and you are taking a real risk.
Mistakes That Cause Failures
- Modified thinset. The most common contractor mistake. Use unmodified, full stop. This is not flexible guidance. It is a system requirement.
- Skipping KERDI-BAND on corners. The corners are the first place water finds a path through. Pre-treat them every time.
- Not overlapping seams enough. Two inches minimum, with thinset under both layers at every overlap.
- Voids behind the membrane. If it is not fully bonded, water will eventually find that air pocket and sit there.
- No flood test. You will not know about a leak until there is real damage. Test before tile.
Florida-specific note: The heat and humidity here put extra stress on shower systems compared to drier climates. If your existing shower has grout cracking along the floor corners, tile that sounds hollow when you tap it, or a musty smell that will not go away, the waterproofing has likely failed or was never installed. Those are not cosmetic issues. They mean water is sitting behind your tile.
Should You DIY This?
Schluter publishes good installation guides and KERDI is available at tile supply stores. It is technically a DIY-possible job if you are detail-oriented and willing to do the flood test. The problem is that if you get waterproofing wrong, the fix is a full tile teardown. The stakes are high enough that most homeowners are better off with a contractor who has installed KERDI many times and will back up the work.
At KV Tileworks, waterproofing is part of every shower build. We do not offer it as an add-on because it is not optional. If you are planning a bathroom remodel in the Sanford, Lake Mary, or Central Florida area, reach out for an estimate and we will walk you through what the build looks like.
Ready to Plan Your Shower?
We build showers right the first time. Proper waterproofing, clean tile work, no shortcuts.
Request an Estimate